How to Sign Into VaultWarden
Home / Guides & Runbooks / Signing Into Vaultwarden
This guide walks you through signing into Bitwarden using Anvil's self-hosted vault.
Prerequisites
Before you begin, make sure you have:
- Accepted your Vaultwarden invite
- While following the sign up process, install the bitwarden extension as prompted
Once both steps are complete, follow the sign-in steps below.
Step 1: Enter Your Email Address
Open the Bitwarden extension. On the login screen, enter your Anvil email address (e.g., yourname@anvil.co) and click Continue.
Make sure "Remember email" is checked if you want Bitwarden to save your email for future logins.
Step 2: Switch to the Self-Hosted Environment
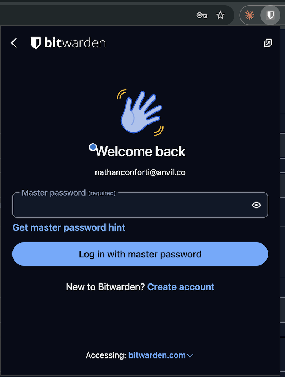
On the next screen ("Welcome back"), look at the bottom of the window where it says "Accessing: bitwarden.com". Click that dropdown.
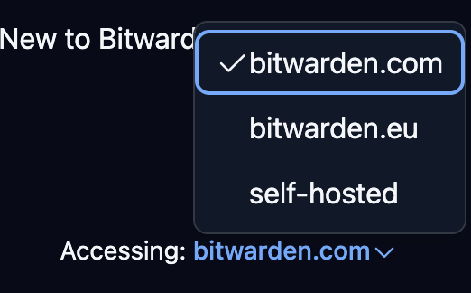
From the dropdown menu, select "self-hosted".
Step 3: Enter the Anvil Server URL
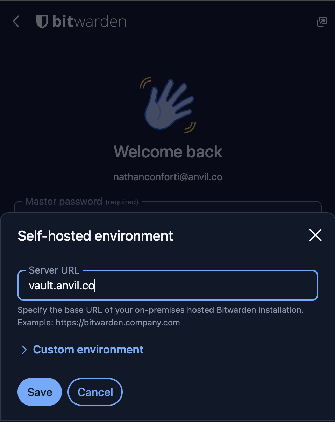
A "Self-hosted environment" dialog will open. In the Server URL field, enter:
Then click Save.
Step 4: Log In With Your Master Password
You'll be returned to the "Welcome back" screen, now pointing at the Anvil vault. Enter your master password and click "Log in with master password".
If you've forgotten your master password, click "Get master password hint" to have a hint sent to your email.